How To Install Eclipse for Python On Windows
It provides all the steps required to install Eclipse with PyDev for Python development on Windows 10 and getting started with Python development using the Hello World Project.
This tutorial provides all the steps required to install Eclipse for developing Python applications on Windows. It explains how to install Eclipse with PyDev to develop Python applications on Windows 10. The same setup can also be used to develop web-based applications using Django. All the steps should be similar for other versions of Windows.
PyDev is a plugin that enables Eclipse for Python development. It adds the features to Eclipse for Python language which includes Code Completion, Code Analysis, Debugger, Interactive Console, Refactoring, Tokens Browser, Django Integration, etc. The main advantage of installing PyDev plugin is that it can be installed on the pre-installed Eclipse that is already available on the system. We can also do a fresh install of Eclipse as shown in this tutorial.
It assumes that Java is already installed on the system. You may also be interested in How To Install Java 14 On Windows, How To Install OpenJDK 14 On Windows and How To Install Java 11 On Windows. It also assumes that Python is already installed on the system. You may also be interested in How To Install Python 3.8 On Windows and How To Install Python On Windows.
You might also be interested in Python Cheatsheet to learn or brush up the basics of Python.
Step 1 - Download Eclipse
Open the Eclipse packages Download Page and scroll down to Eclipse IDE for Web and JavaScript Developers as highlighted in Fig 1.
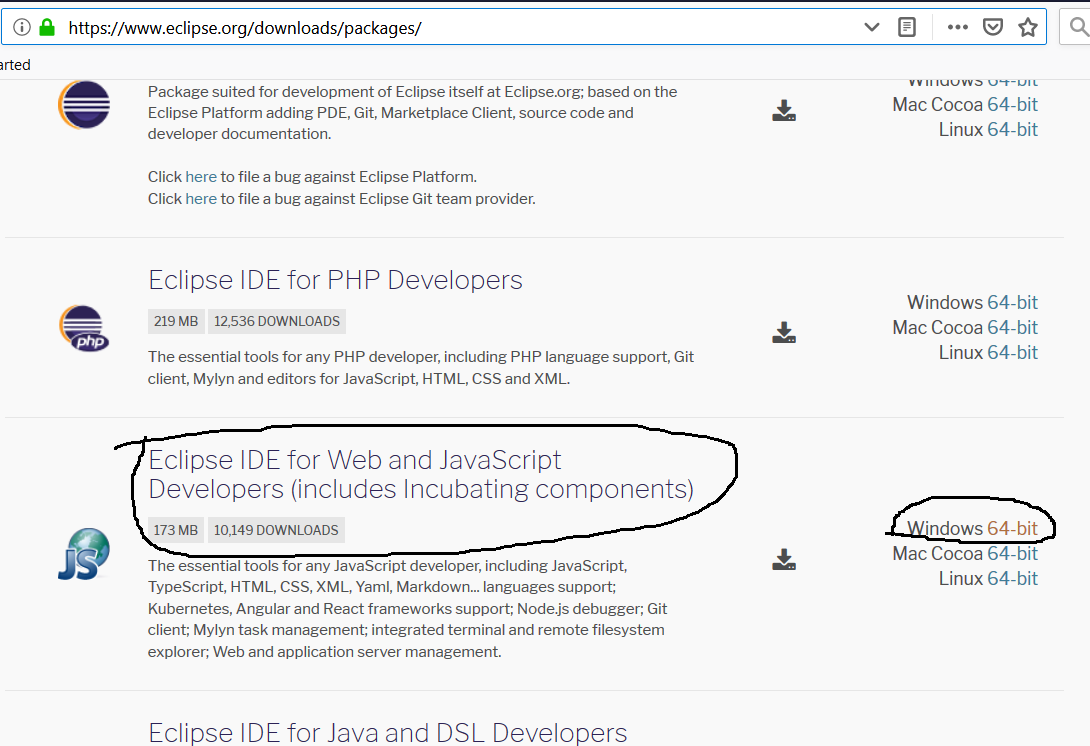
Fig 1
Click on the Windows 64-bit link as highlighted in Fig 1. It will navigate to the download page as shown in Fig 2.
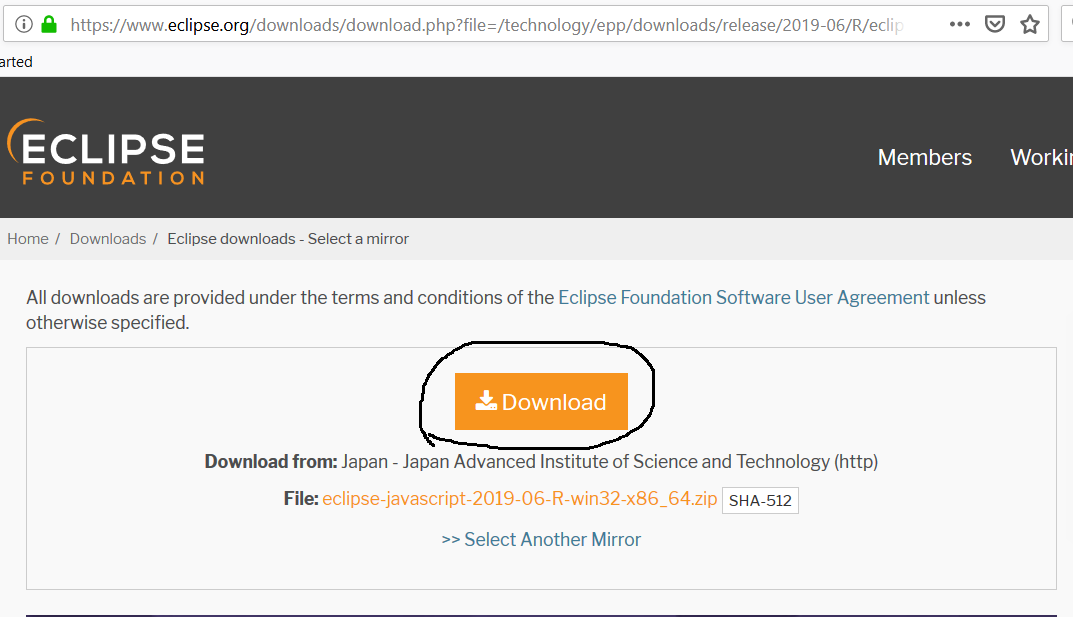
Fig 2
Click on the Download Button to start the download.
Step 2 - Install Eclipse
We can simply extract the zip file downloaded in the previous step to complete the installation. The files that ships with the zip are as shown in Fig 3.
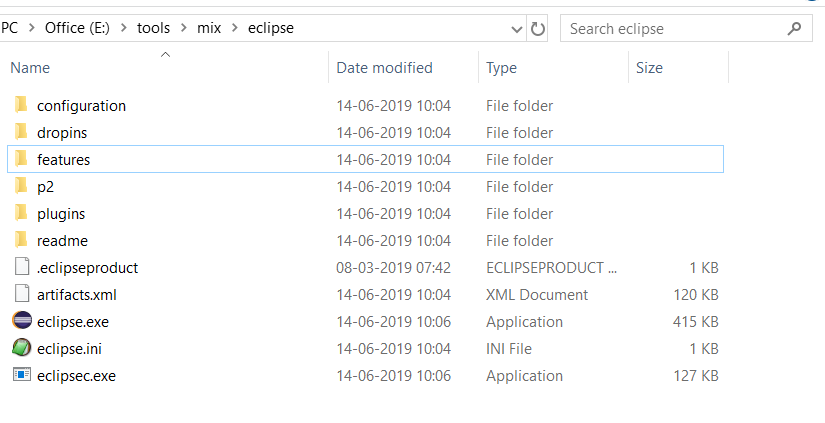
Fig 3
You can also create a desktop shortcut icon to launch the Eclipse from the desktop. Launch the Eclipse by double-clicking on either the executable file or desktop shortcut added by you. It will show the option to configure the current workspace as shown in Fig 4.
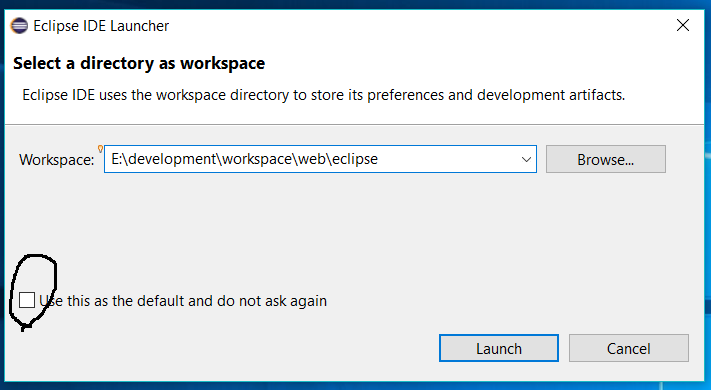
Fig 4
Keep the checkbox unchecked as highlighted in Fig 4. It will show the workspace selection every time we launch the Eclipse IDE to choose the current workspace. After providing an appropriate workspace location, click on the Launch Button to start Eclipse. It will show the Welcome Screen as shown in Fig 5.
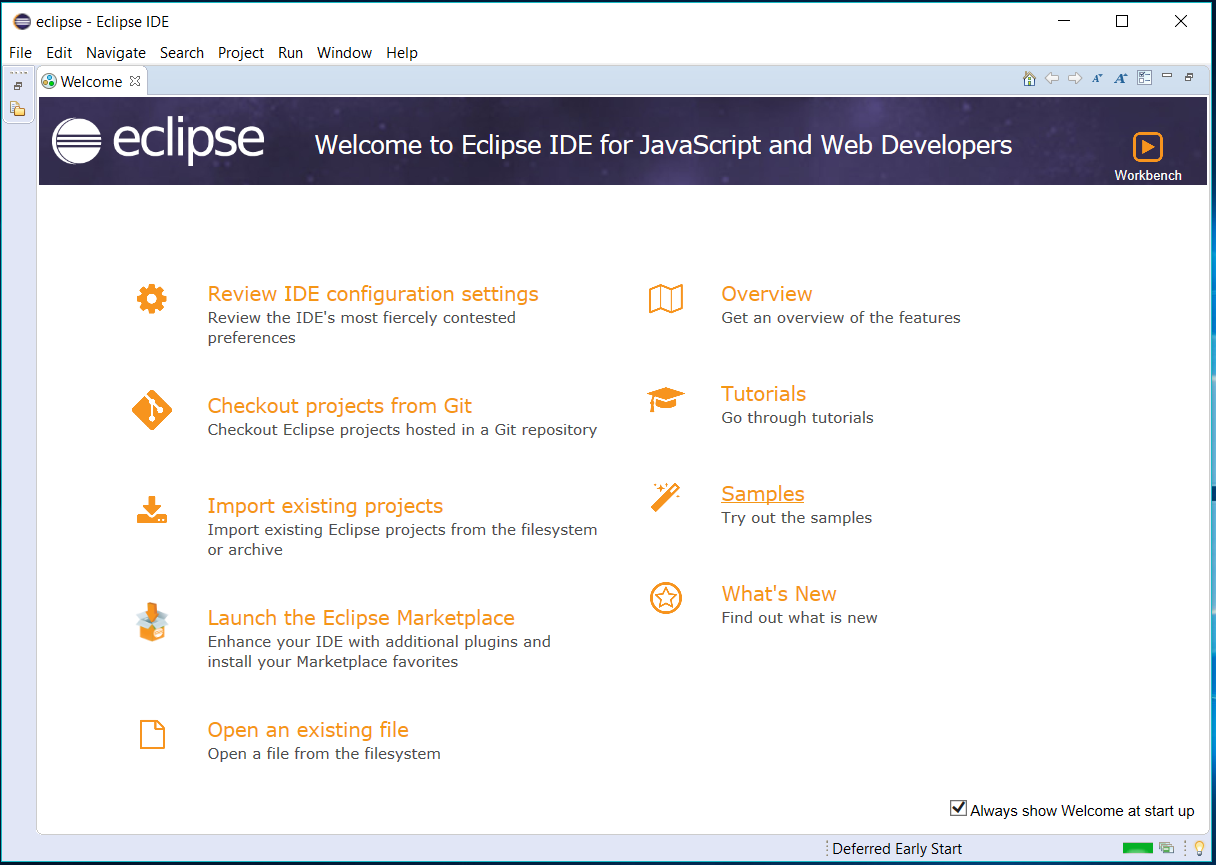
Fig 5
Step 3 - Install PyDev Plugin
Click on Help -> Eclipse Marketplace to open the Eclipse Marketplace wizard. Search for PyDev on the marketplace. It will show the search results as shown in Fig 6.
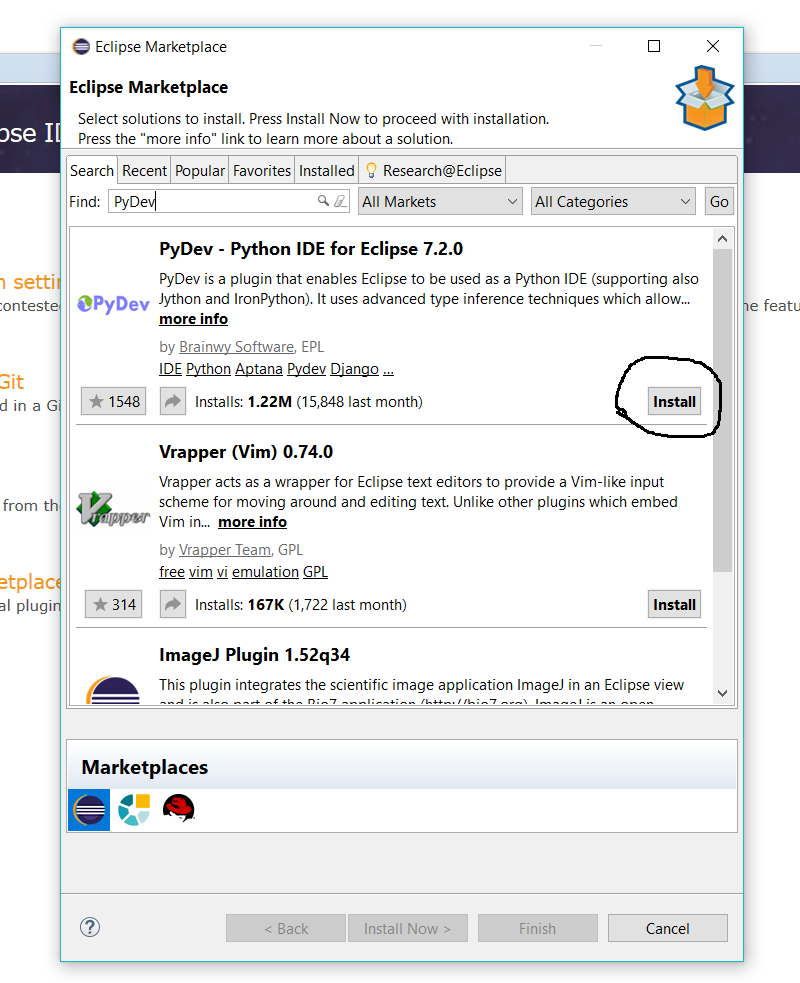
Fig 6
Click the Install Button to start installing the PyDev plugin for Eclipse. It will fetch the details of the plugin from the marketplace and shows the available options as shown in Fig 7.
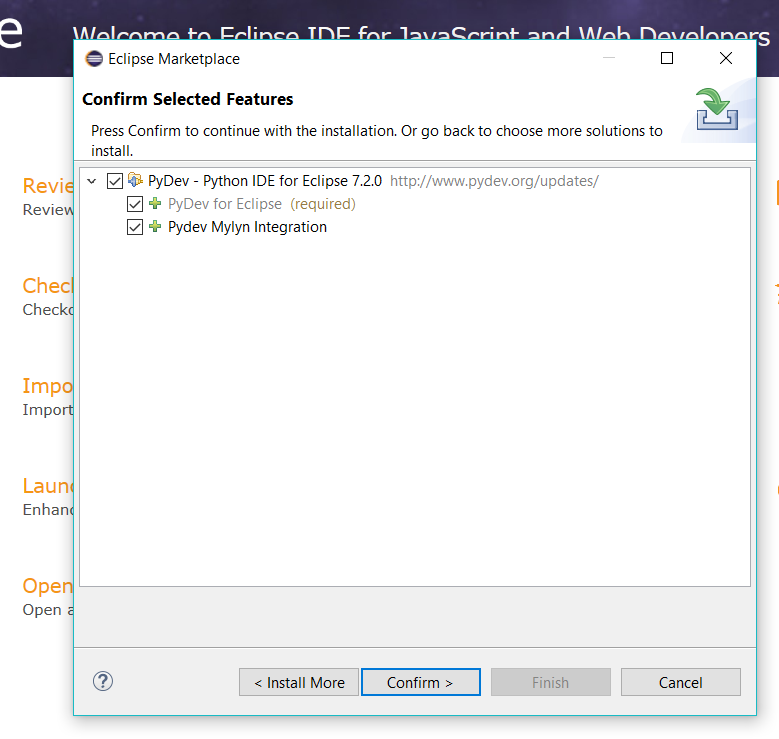
Fig 7
Click the Confirm
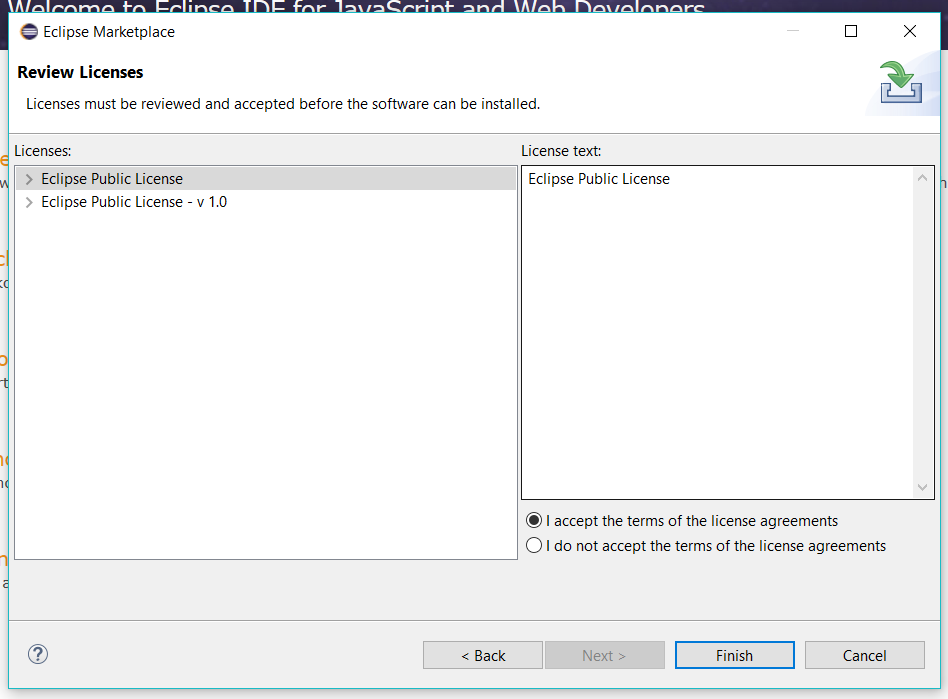
Fig 8
Click the Finish
Step 4 - Getting Started with Python - Hello World
In this step, we will create our first Python Project using eclipse and create the first program to print Hello World on the console.
Click on Windows -> Perspective -> Open Perspective -> Other to open the PyDev perspective for Python development as shown in Fig 9.

Fig 9
Choose the PyDev perspective and click the Open Button to open the perspective. With the PyDev perspective open, we will create the first Python project. Click on File -> New -> PyDev Project as shown in Fig 10 to start creating the project.
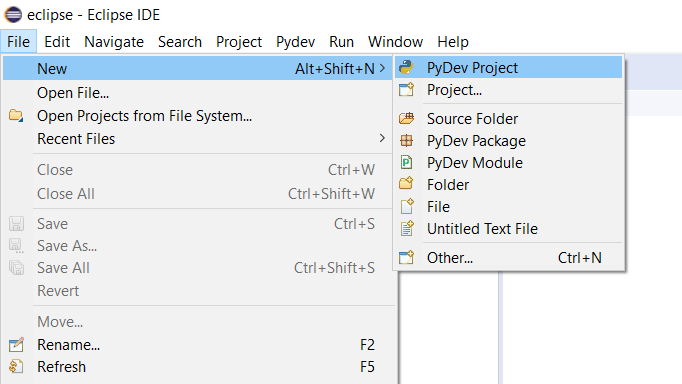
Fig 10
The next wizard shows the options to configure the Project as shown in Fig 11.
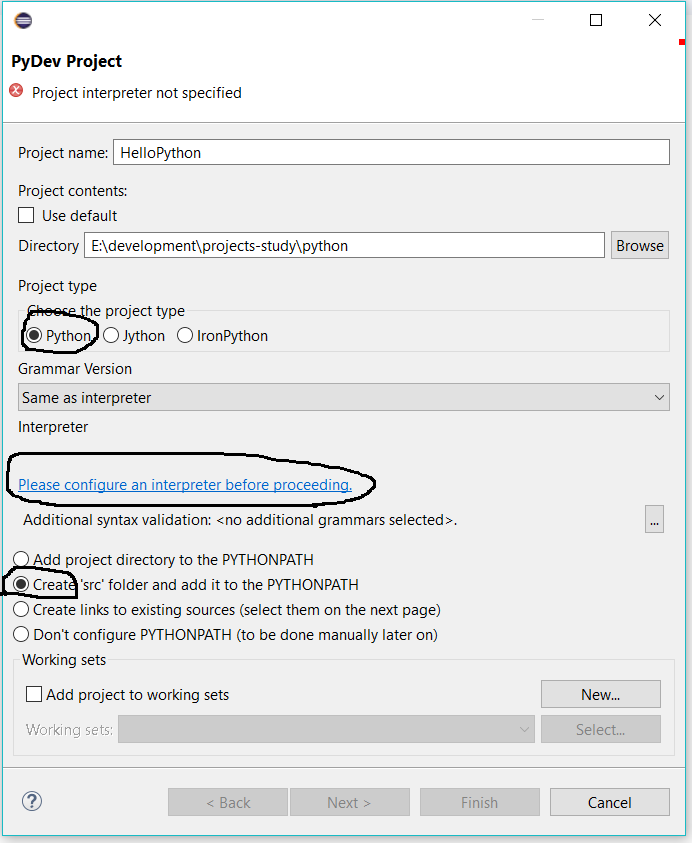
Fig 11
We can see that the project configuration wizard shows a link to configure the Python interpreter. Now click the highlighted link to start configuring the interpreter. It will show the available options as shown in Fig 12.
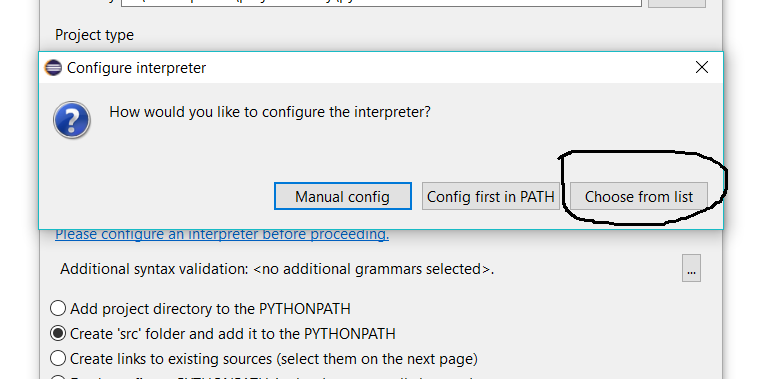
Fig 12
Click the Choose From List Button. It will show the available interpreters as shown in Fig 13.
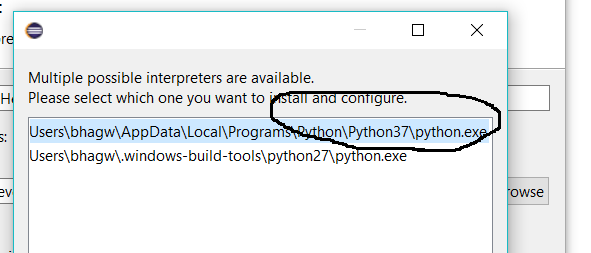
Fig 13
Choose the main interpreter as highlighted in Fig 13 and click the Ok Button. It will also ask to configure the python path as shown in Fig 14.
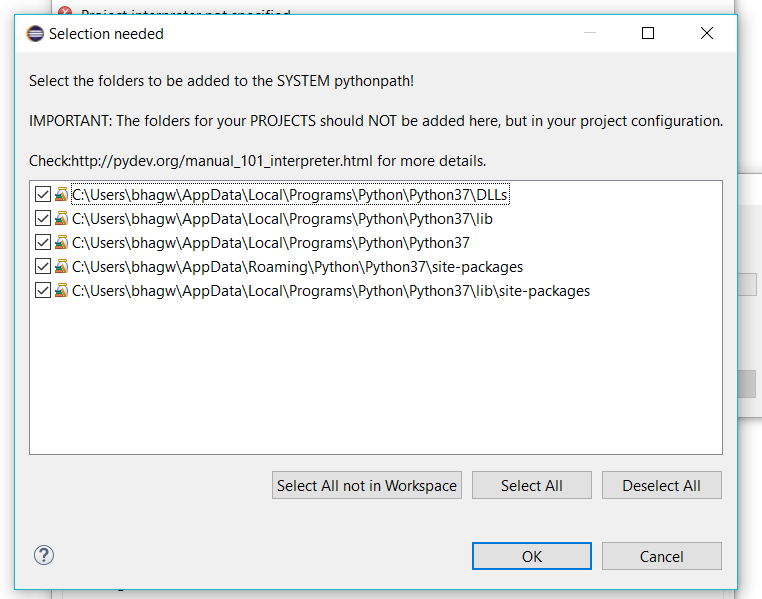
Fig 14
Keep the paths selected on click on the OK
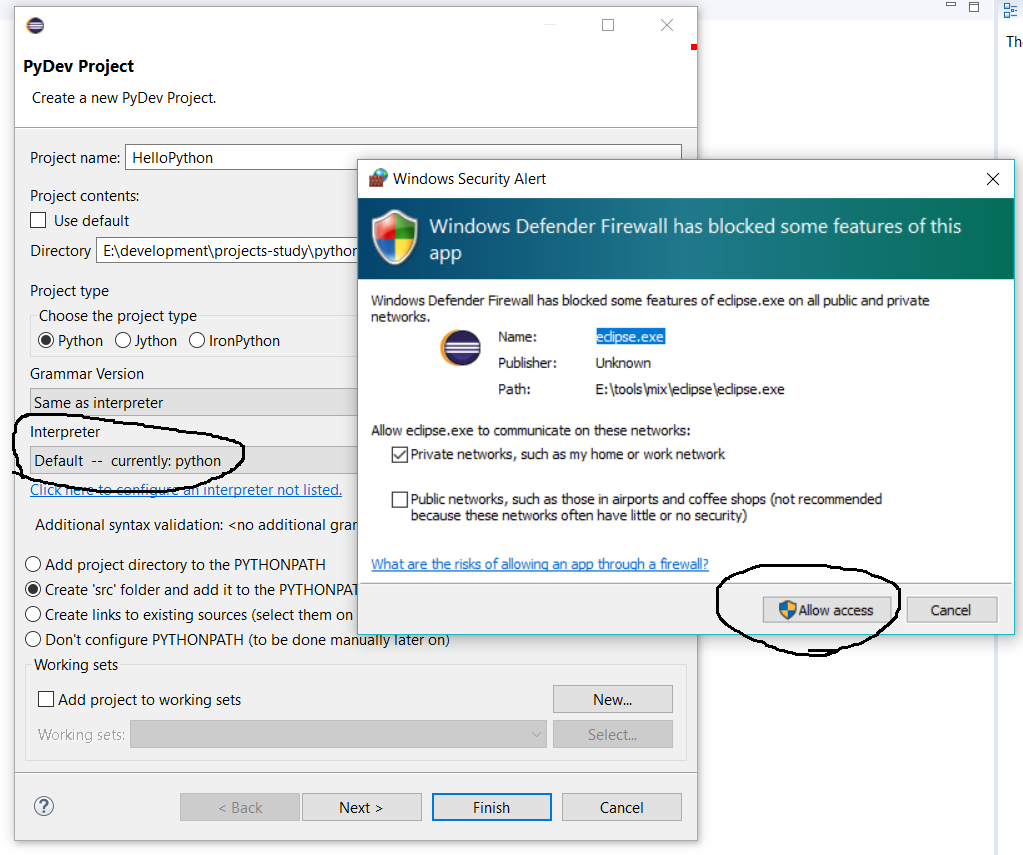
Fig 15
Notes: We only need to configure the interpreter for the first project. It will show the list of available interpreters from the second project onwards and we can update the interpreter configuration if required.
Click the Finish Button to complete
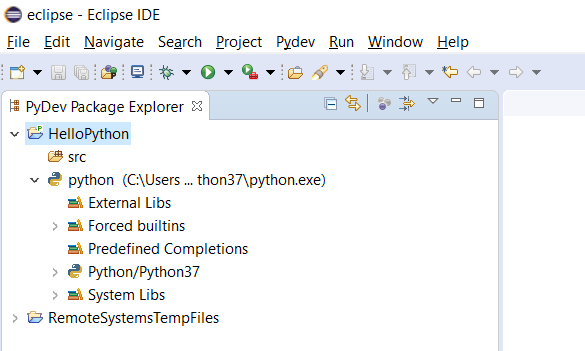
Fig 16
Now right-click on Src and click New -> PyDev Package as shown in Fig 17.
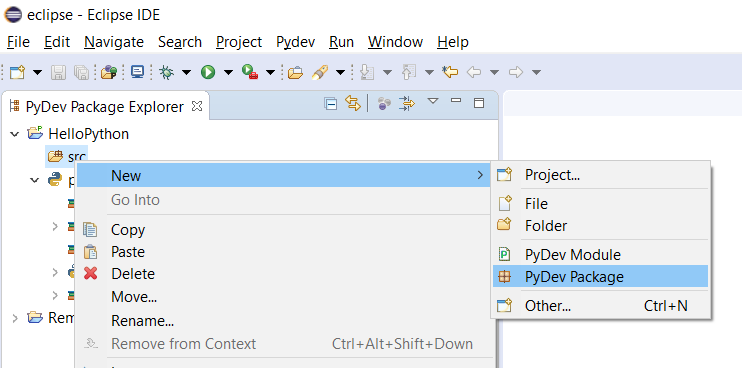
Fig 17
Provide an appropriate package name and click the OK
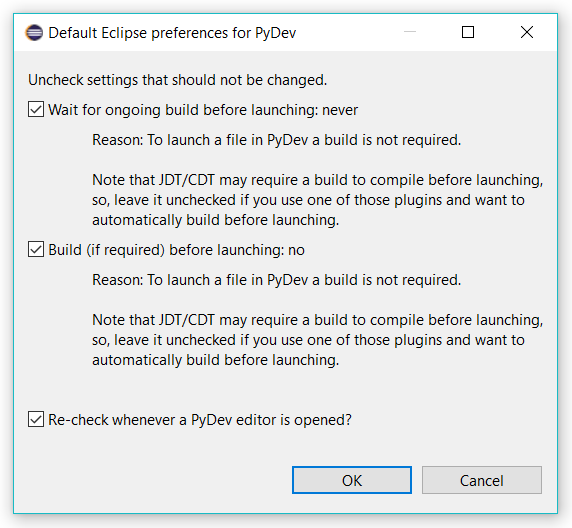
Fig 18
Click the Ok Button to confirm the preferences. We can change them later if required. It will create the Regular Package and also creates the corresponding __init__.py as shown in Fig 19.
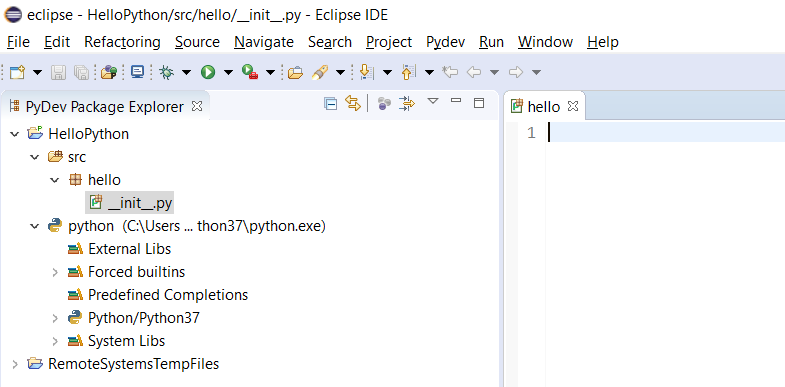
Fig 19
Now we will create our first Python Module to print Hello World on the console. Keep the package selected and right-click -> New -> PyDev Module to start creating the Module as shown in Fig 20.
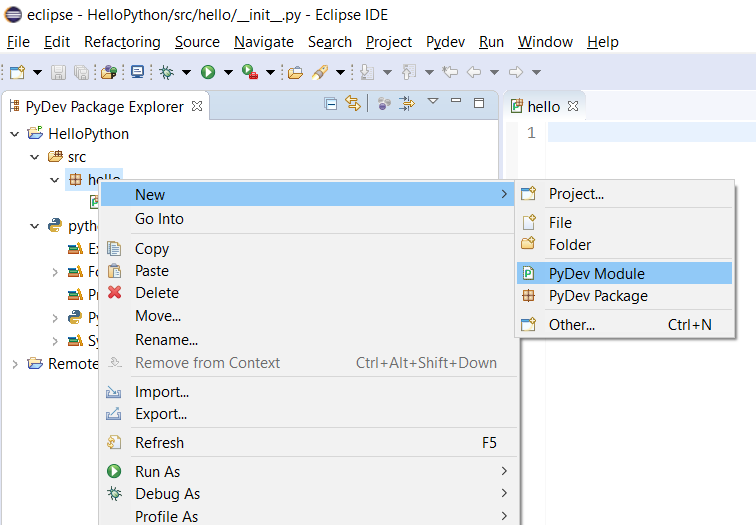
Fig 20
It will show the wizard to configure the Module name. Now provide the appropriate Module name and click the Finish Button to create the module. It will also ask to choose the module template as shown in Fig 21.
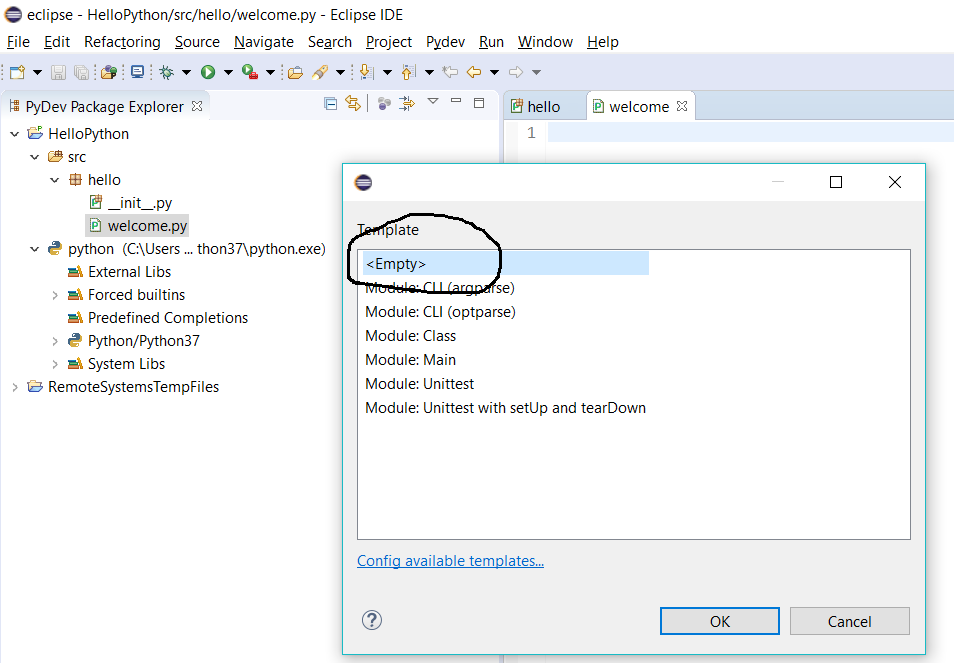
Fig 21
I have selected the Empty Template for this tutorial to keep it simple. Click the OK Button to configure the module template.
Now update the module to print Hello World as shown in Fig 22.
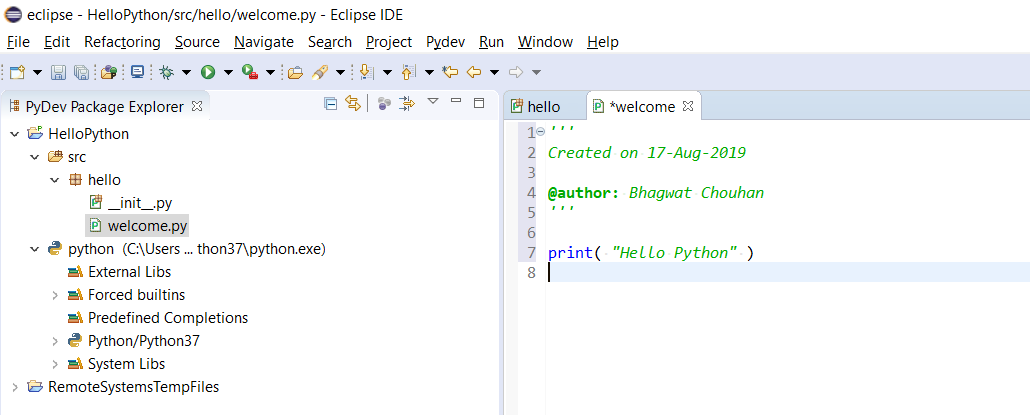
Fig 22
Finally, we will execute the module to print the output on the console. Click on Run -> Run As -> Python Run to execute the program as shown in Fig 23.
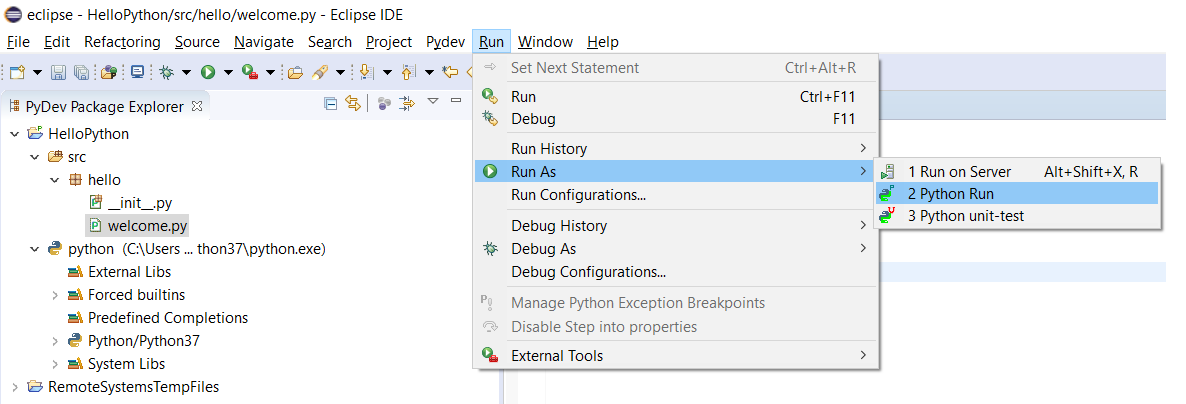
Fig 23
It will execute the program and shows the output on the console as shown in Fig 24.
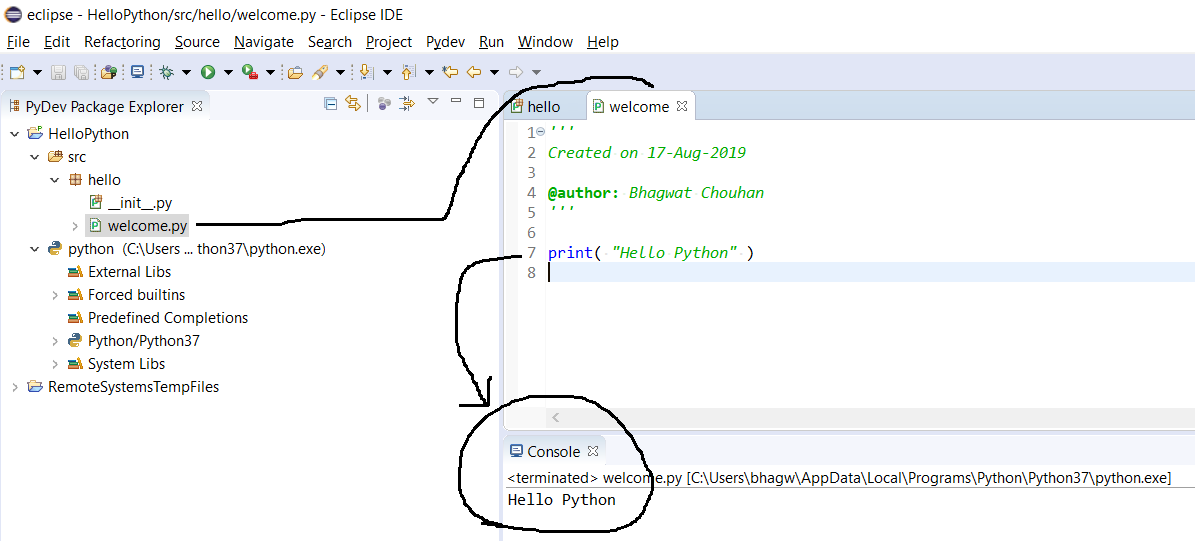
Fig 24
Summary
This tutorial provided all the steps to download, install and configure Eclipse with PyDev on Windows 10. We have also created the first project, the first module, and the first package to print Hello Python on the console. This is all about beginning Python programming using Eclipse with PyDev. You may join the discussion on installing Eclipse with PyDev on Windows using the comment box.


